Are you tired of constantly adjusting your screen brightness on Windows 10 depending on the time of day? Setting up a brightness schedule can save you the hassle and make your computing experience more convenient and comfortable. In this guide, we will walk you through the steps on how to set up a brightness schedule on Windows 10, allowing your display to automatically adjust its brightness levels at specific times. Whether you’re working late at night or enjoying a sunny afternoon, mastering your display’s brightness schedule can help reduce eye strain and enhance readability. Stay tuned to learn how to optimize your screen settings for a seamless viewing experience!
Understanding Display Brightness
Display brightness plays a crucial role in ensuring optimal viewing experience on your Windows 10 device. Adjusting the brightness not only enhances visual comfort but also helps in conserving battery life.
Importance of Display Brightness
Setting the appropriate brightness level can prevent eye strain, especially during prolonged device usage. Moreover, adjusting brightness according to ambient lighting conditions can improve readability and reduce glare.
How to Set Up a Brightness Schedule on Windows 10
To master your display brightness, navigate to ‘Settings’ and select ‘System’. Then, click on ‘Display’ and toggle the ‘Change brightness automatically when lighting changes’ option. You can also manually adjust the brightness level using the slider.
- Scheduling Brightness: You can schedule the display brightness adjustments by accessing the ‘Power & sleep’ settings and clicking on ‘Additional power settings’. From here, choose ‘Change plan settings’ and then ‘Change advanced power settings’ to set up a brightness schedule.
Benefits of Setting Up a Brightness Schedule
Setting up a brightness schedule on your Windows 10 device can have numerous benefits for your overall user experience and health.
Reduced Eye Strain
By adjusting the brightness of your screen based on the time of day, you can significantly reduce eye strain, especially during late-night use.
Improved Sleep Quality
Reducing the blue light emissions during evening hours can help improve your sleep quality by preventing disruptions to your circadian rhythm.
Step 1: Accessing Display Settings on Windows 10
To set up a brightness schedule on Windows 10, you first need to access the Display Settings. Here’s how you can do it:
Using the Start Menu
1. Click on the Start menu at the bottom left corner of your screen.
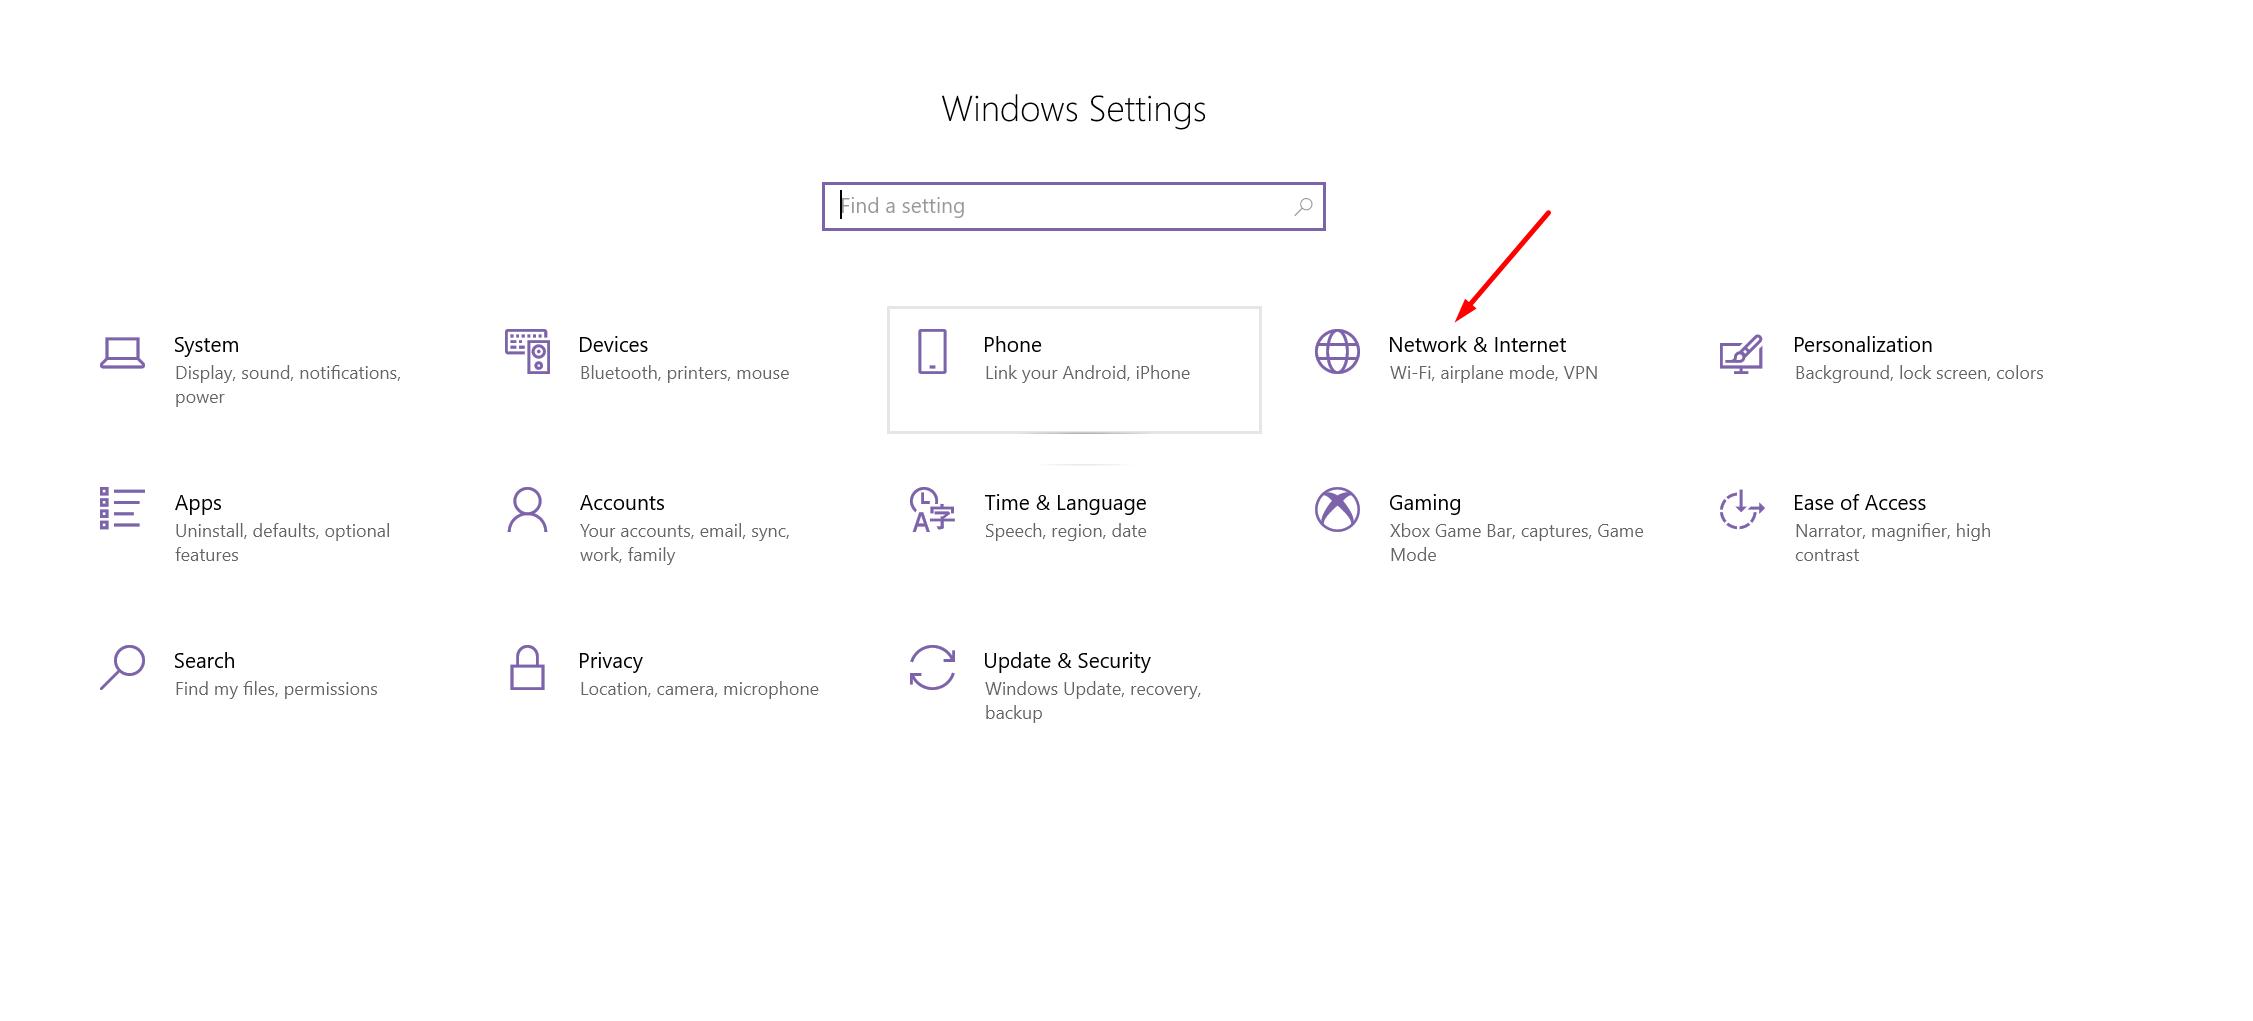
2. Select Settings (the gear icon) to open the Settings window.
3. In the Settings window, click on System to access system settings.
4. From the left sidebar, select Display to view display settings.
Keyboard Shortcut
If you prefer using a keyboard shortcut, press Windows key + I to open the Settings window directly.
Step 2: Setting Up Scheduled Brightness Adjustments
After customizing your display settings on Windows 10, the next step is to set up scheduled brightness adjustments. This feature allows you to automatically adjust the screen brightness based on your preferred schedule, helping to reduce eye strain and save battery life.
Adjusting Brightness Settings
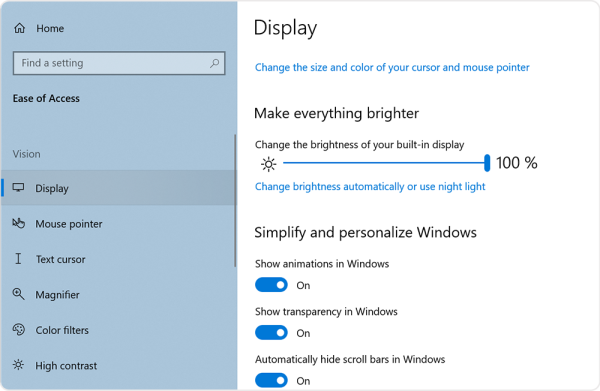
To begin, navigate to the “Settings” menu by clicking on the Start button and selecting the gear icon. From there, choose “System” and then “Display”. Under the “Brightness and color” section, you can adjust the brightness level to your liking.
You can also enable the “Change brightness automatically when lighting changes” option to allow Windows 10 to adjust the brightness based on ambient light conditions.
Scheduling Brightness Adjustments
To create a schedule for brightness adjustments, go to the “Settings” menu and select “System”. Click on “Display” and scroll down to find the “Night light settings”. Here, you can set a custom schedule for when you want the brightness to change automatically.
- Select the “Scheduled” option under the “Schedule night light” section.
- Choose the start and end times for the scheduled brightness adjustments.
- You can also adjust the color temperature to reduce blue light exposure during the night.
Step 3: Customizing Your Brightness Schedule
After setting up your initial brightness schedule on Windows 10, you may want to customize it further to meet your specific preferences and needs. This step allows you to tailor the brightness settings based on your daily routine and usage patterns.
Adjusting Brightness Levels
To customize your brightness schedule, navigate to the display settings on your Windows 10 device. From there, you can easily adjust the brightness levels to your liking. Ensure to save the changes once you’re satisfied with the adjustments.
Setting Up Time-Specific Brightness
You can also set different brightness levels for different times of the day. For example, you may want a higher brightness level during daylight hours and a lower one in the evening. Windows 10 allows you to create custom brightness schedules based on specific time periods.
- Go to the display settings
- Select “Night light settings”
- Adjust the brightness levels for day and night
Tips for Conserving Energy and Eye Health
When setting up a brightness schedule on Windows 10, it’s important to consider ways to conserve energy and maintain eye health. Here are some useful tips:
Adjust Display Brightness Settings
To reduce energy consumption and prevent eye strain, lower the display brightness during low-light conditions. Adjusting the brightness levels can also help in saving battery life on laptops and portable devices.
Use Blue Light Filters
Blue light from screens can disrupt sleep patterns and cause eye fatigue. Enable blue light filters on your device to reduce the harmful effects of blue light exposure, especially during nighttime browsing sessions.
Take Regular Screen Breaks
Give your eyes a break by following the 20-20-20 rule: every 20 minutes, look at something 20 feet away for 20 seconds. This practice helps in preventing eye strain and maintaining good eye health.
Consider using eye drops and artificial tears to keep your eyes moisturized when working on screens for extended periods.
Further Enhancements and Tools
After setting up a brightness schedule on Windows 10, there are additional enhancements and tools you can utilize to optimize your display settings further.
Calibration Tools
One useful enhancement is to use display calibration tools to adjust color settings and ensure accurate representation on your screen. These tools help in improving the overall visual experience and color accuracy.
Blue Light Filters
Another handy tool is the built-in blue light filter feature in Windows 10 that helps reduce eye strain by adjusting the color temperature of your display, especially during night time browsing or working sessions.
Task Scheduler
For further customization, you can use the Task Scheduler in Windows 10 to automate brightness adjustments at specific times. This allows you to tailor the brightness levels according to your usage patterns.
Frequently Asked Questions
- Can I schedule the brightness on Windows 10?
- Yes, you can set up a brightness schedule on Windows 10 to adjust the screen brightness automatically at specific times.
- How do I access the brightness settings on Windows 10?
- You can access the brightness settings on Windows 10 by going to the Settings menu, then selecting System and choosing Display.
- Is it possible to set different brightness levels for different times of the day?
- Yes, by setting up a brightness schedule on Windows 10, you can customize the brightness levels based on your preferred times.
- Will setting up a brightness schedule help in reducing eye strain?
- Adjusting the brightness levels on your display based on the time of day can contribute to reducing eye strain, especially during late hours.
- Can I manually override the brightness schedule if needed?
- Yes, you can manually adjust the brightness settings on Windows 10 even if you have a predefined brightness schedule in place.
Master Your Windows 10 Brightness Schedule
In conclusion, mastering your display brightness schedule on Windows 10 can greatly improve your user experience and overall productivity. By following the simple steps outlined in this blog, you can easily set up a personalized brightness schedule that suits your preferences and lifestyle.
Remember, adjusting your screen’s brightness not only enhances visual comfort but also helps in reducing eye strain and conserving energy.
Take the time to experiment with different brightness levels and schedules to find what works best for you. With this valuable knowledge in hand, you can optimize your Windows 10 display settings to support your well-being and efficiency.