Are you looking to streamline your time management and organizational skills with a digital touch? Learning how to create a schedule in Excel can be your ultimate solution. Excel, with its powerful features and user-friendly interface, offers a versatile platform to craft personalized schedules tailored to your specific needs. In this step-by-step guide, we will delve into the intricate yet rewarding process of creating a schedule in Excel. Whether you are a student looking to organize your study time, a professional striving for better work planning, or a homemaker juggling multiple responsibilities, mastering this skill can significantly boost your productivity and efficiency. Let’s unlock the potential of Excel together!
Introduction to Creating Schedules in Excel
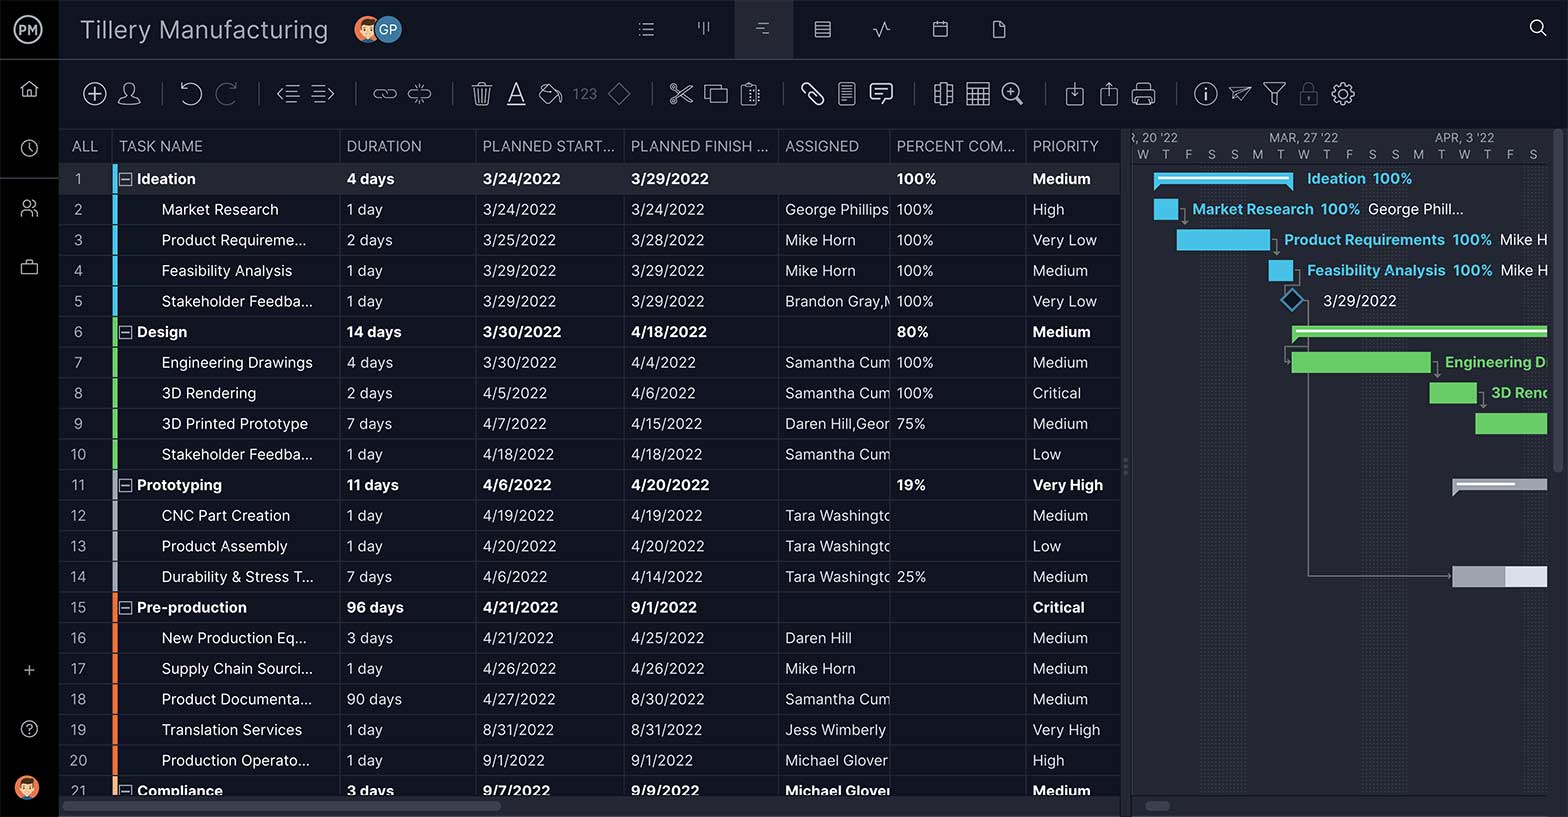
When it comes to organizing tasks and managing time effectively, Excel is a powerful tool that professionals rely on. In this guide, we will walk you through the process of creating schedules in Excel, enabling you to streamline your workflow and boost productivity in managing your time efficiently .
Why Use Excel for Scheduling?
Excel offers a user-friendly platform for creating customized schedules tailored to your specific needs. From daily routines to project timelines, Excel’s versatile features allow you to customize layouts and formulas for optimal scheduling.
Benefits of Using Excel for Schedules
By utilizing Excel for scheduling, you can easily track deadlines , set reminders, and visualize your calendar in a clear and organized manner. Additionally, Excel enables you to analyze data and make informed decisions to enhance your time management strategies.
:max_bytes(150000):strip_icc()/YTD-V2-2a43c52527b840ee946b51e2efeb1a4c.jpg)
Setting Up Your Excel Spreadsheet
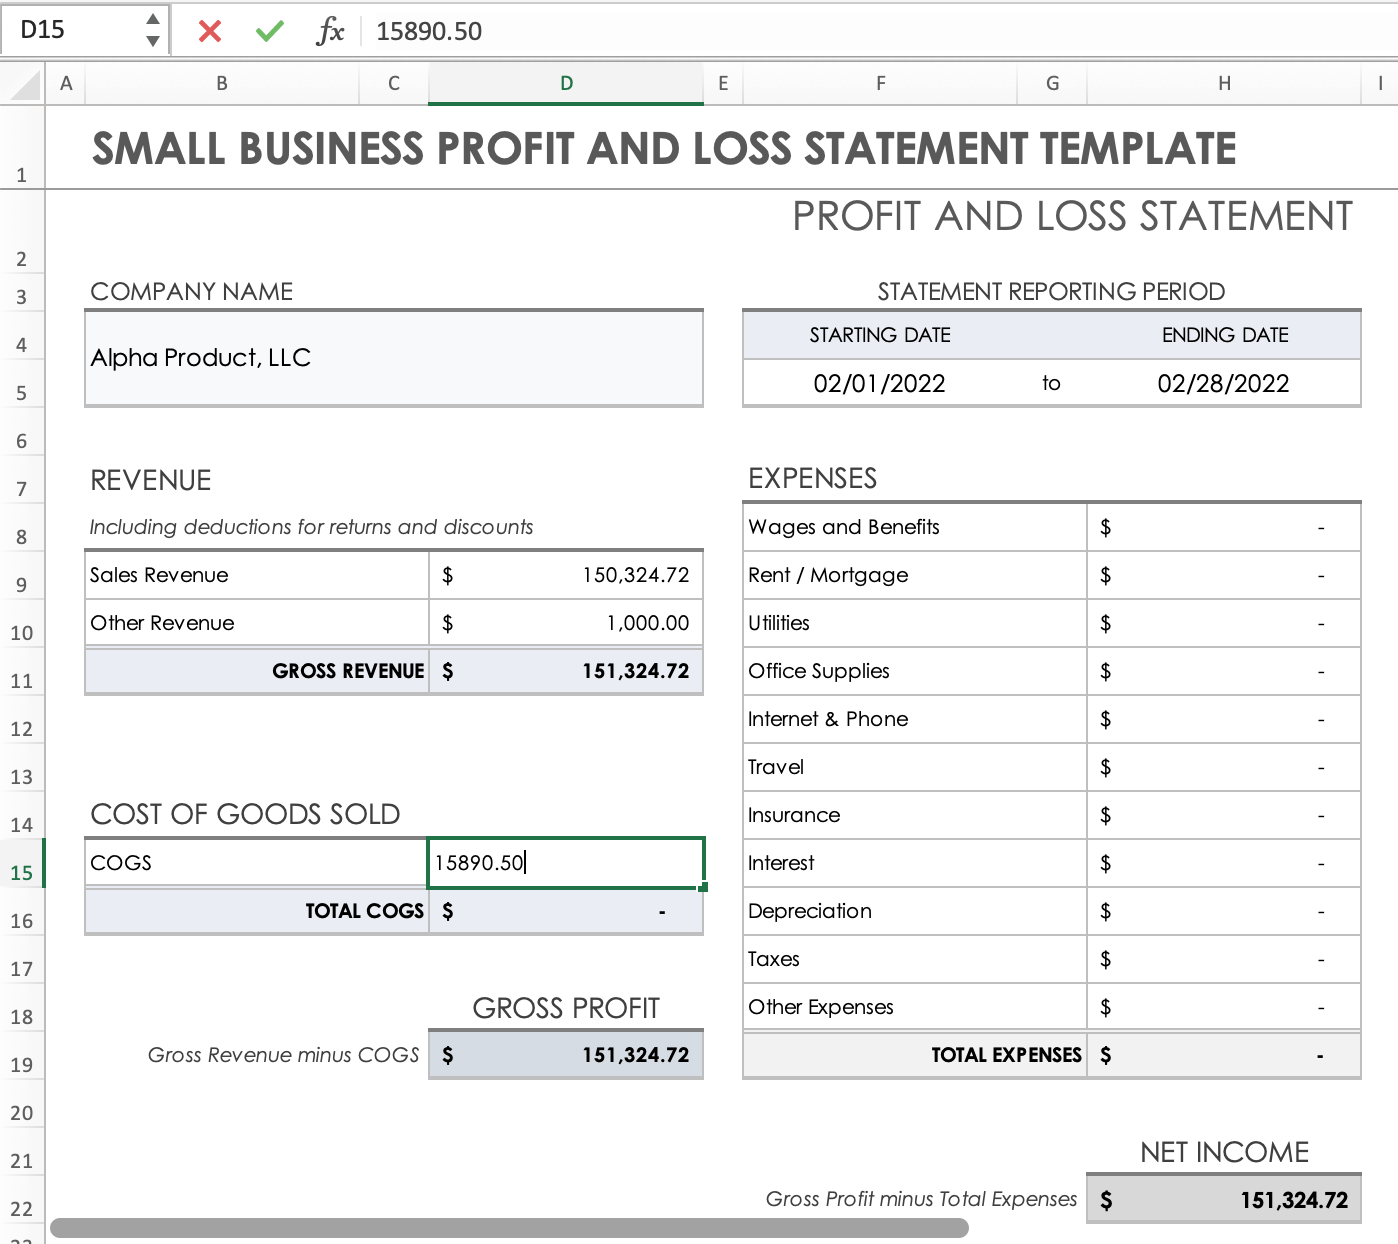
When it comes to creating a schedule in Excel, setting up your spreadsheet correctly is crucial for efficiency and clarity. To start, open Excel and create a new blank workbook. Next, label the necessary columns such as Date, Time, Task, Duration, etc. This will help organize your schedule effectively.
Formatting Cells
Once you have labeled your columns, it’s essential to format the cells appropriately. For dates, use the Date format, for times, use the Time format. You can also customize the cell format to display the data as needed.
Adding Data
Now, start entering your schedule data into the corresponding cells. Make sure to include details like task descriptions, starting times, and durations. You can also use color-coding and conditional formatting to highlight important information.
Defining the Time Periods and Activities
When creating a schedule in Excel, it’s crucial to define the time periods and activities clearly. **How do you create a schedule in Excel** involves first determining the duration of the project or tasks you want to schedule. Remember that the time periods you set should align with your project’s goals and deadlines.
Setting Time Periods
Start by identifying the start and end dates for your project. In Excel, use the DATE function to input these dates accurately. Include the year 2022 in your starting point to ensure relevance.
Next, break down the project timeline into smaller units, such as days, weeks, or months, depending on the project’s scope and complexity.
Defining Activities
**How do you create a schedule in Excel** involves listing down all the tasks and activities required to complete the project. Use Excel’s cells to create a structured list of activities, including task names, durations, and dependencies. This will help you visualize the workflow and ensure a smooth project progression.
- Task 1: Research and gather information
- Task 2: Prepare project outline
- Task 3: Start data entry
- Task 4: Review and finalize project
Adding Formulas and Functions for Automation
When creating a schedule in Excel, formulas and functions can significantly enhance automation and efficiency. By utilizing Excel’s built-in functions, you can streamline processes and reduce manual efforts, making your scheduling tasks more accurate and time-saving.
Using SUM Function
The SUM function is handy for adding up values in a range. Simply input =SUM(range) to quickly calculate total hours, expenses, or any numerical data in your schedule.
Utilizing IF Function
The IF function allows for conditional logic in your schedule. It can be used to display different values based on specified criteria. Use =IF(logical_test, value_if_true, value_if_false) for dynamic scheduling based on conditions.
Creating Automated Date Functions
Excel offers various date functions like TODAY() and NOW() to automatically insert current dates and times. These functions ensure that your schedule remains up to date without manual intervention.
Customizing the Schedule with Formatting
When working with Excel to create a schedule, customization with formatting can make your schedule more visually appealing and easier to read.
Color Coding
You can **highlight** important dates or tasks by **** and time-consuming tasks in **
Applying Borders and Gridlines
Adding borders around cells or sections can help in distinguishing different parts of your schedule. Using gridlines can also make it easier to read the information at a glance.
Utilizing Conditional Formatting
**Conditional formatting** allows you to automatically apply formatting to cells based on specific criteria. For example, you can set up rules to highlight ** due dates that are approaching or tasks that are overdue
Reviewing and Adjusting the Schedule
When it comes to creating a schedule in Excel, reviewing and adjusting the schedule is a crucial step to ensure its effectiveness and accuracy. Regularly reviewing the schedule allows you to identify any inconsistencies or errors, ensuring that tasks are completed on time and resources are allocated efficiently.
Checking for Errors and Discrepancies
Go through the schedule systematically to check for any errors or discrepancies. Look for overlapping tasks, missing deadlines, or any other inconsistencies that may affect the overall timeline.
Make good use of Excel’s formulas and functions to automatically highlight any potential issues, such as conditional formatting to flag overdue tasks.
Adjusting the Schedule
After identifying any errors or areas that need modification, it’s time to make adjustments to the schedule. This may involve revising deadlines, reallocating resources, or reordering tasks to optimize efficiency.
- Update Task Durations: If certain tasks are taking longer than expected, adjust the duration to reflect the actual time required.
- Resource Reallocation: If resources are being underutilized or overburdened, consider reallocating them to balance workload.
- Task Dependencies: Ensure that task dependencies are accurately represented to avoid any bottlenecks in the workflow.
Frequently Asked Questions
- What is the importance of creating a schedule in Excel?
- Creating a schedule in Excel can help you stay organized, manage your time effectively, and track important dates and deadlines.
- How can I start creating a schedule in Excel?
- To start creating a schedule in Excel, open a new spreadsheet, list down the tasks or activities you want to schedule, and allocate time slots for each task.
- What Excel features can be useful for creating a schedule?
- Excel offers features like conditional formatting, data validation, and formulas like SUM, COUNTIF, and IF which can be useful for creating and managing schedules effectively.
- Can I customize the appearance of my schedule in Excel?
- Yes, you can customize the appearance of your schedule in Excel by changing fonts, colors, borders, and using conditional formatting to make it visually appealing and easy to read.
- How can I add formulas to automate calculations in my schedule?
- You can add formulas in Excel to automate calculations like total hours worked, percentage completion, or deadline countdowns to make your scheduling process more efficient and dynamic.
Wrapping Up: Master Excel Scheduling!
As we conclude this detailed guide on how to create a schedule in Excel, it’s clear that mastering this tool can significantly enhance your organization and time management skills. By following our step-by-step instructions, you now have the knowledge to efficiently plan your tasks, track deadlines, and optimize your workflow using Excel’s powerful features.
Remember, Excel offers endless customization possibilities, so feel free to experiment and tailor your schedules to suit your unique needs. Whether you’re a student, professional, or entrepreneur, Excel can be your ultimate scheduling ally.
So roll up your sleeves, dive into Excel, and start creating impactful schedules that propel you towards success!