Are you looking to enhance your Instagram strategy by scheduling posts like a pro? Knowing how to schedule an Instagram post can be a game-changer in maintaining consistency and engaging your audience effectively. In this comprehensive guide, we will break down the step-by-step process of scheduling Instagram posts to save you time and effort while maximizing your reach.
Whether you’re a social media manager, influencer, or small business owner, mastering the art of scheduling Instagram posts will streamline your content creation process and allow you to engage with your followers more strategically. Let’s delve into the specifics of how you can schedule an Instagram post efficiently and optimize your social media presence like a pro.
Understanding the Importance of Scheduling Instagram Posts
Scheduling Instagram posts is crucial for maintaining a consistent online presence and engaging with your audience effectively. By scheduling your posts in advance, you can save time, plan your content strategy more efficiently, and ensure that your posts are published at optimal times for maximum visibility.
Increased Engagement
By scheduling your Instagram posts, you can reach your audience when they are most active on the platform. This increased visibility can lead to higher engagement rates, including likes, comments, and shares, ultimately boosting your profile’s overall performance.
Additionally, posting consistently on Instagram can help you maintain a strong connection with your followers and attract new ones organically.
Time Management
Scheduling posts in advance allows you to batch your content creation process, saving you time and streamlining your workflow. This way, you can focus on creating high-quality content without the stress of having to post in real-time.
- Plan your content calendar
- Create and schedule posts in bulk
- Allocate time for engagement with your audience

Exploring Different Tools for Scheduling Instagram Posts
When it comes to scheduling Instagram posts like a pro, utilizing the right tools can make all the difference. There are various tools available that offer features to help streamline your content planning and posting process.
Buffer
Buffer is a popular social media management tool that allows you to schedule posts for Instagram and other platforms. Its user-friendly interface and analytics make it a go-to choice for many marketers.
Hootsuite
Hootsuite is another robust tool that enables users to schedule Instagram posts, engage with followers, and monitor social media performance. Its multi-platform scheduling capabilities make it a versatile option.
Later
Later is specifically focused on visual content and is an excellent choice for Instagram scheduling. Its visual planner helps you see how your posts will look on your feed before scheduling them.
Sprout Social
Sprout Social offers comprehensive social media management features, including post scheduling for Instagram. It also provides in-depth analytics to track your performance across platforms.
Image Editing Tools
Tools like Canva and Adobe Spark can help you create visually appealing content to schedule on Instagram. Enhancing your images before scheduling can make your posts stand out.
Step 1: Creating an Account on a Scheduling Tool
When it comes to scheduling Instagram posts like a pro, the first step is to create an account on a reliable scheduling tool. One popular option is Hootsuite, known for its user-friendly interface and comprehensive features.
Setting Up Your Account
To get started, visit the official website of the scheduling tool you’ve chosen. Click on the “Sign Up” or “Create Account” button to begin the registration process. Provide the required information such as your email address, username, and password.
Make sure to choose a strong password to secure your account securely.
Verifying Your Account
After creating your account, you may need to verify your email address by clicking on the verification link sent to your inbox. This step is crucial to activate your account and access all the features of the scheduling tool.
- Check your email inbox for the verification link.
- Click on the link to verify your account.
- Once verified, you’re ready to start scheduling your Instagram posts with ease.
Step 2: Connecting Your Instagram Account
After downloading and logging into a reliable Instagram scheduling tool, the next step is to connect your Instagram account. This process allows the scheduling tool to post content on your behalf at your specified times.
Connecting via Instagram Scheduling Tool
To connect your Instagram account, navigate to the settings or account section of the scheduling tool. Look for an option that says “Connect Account” or something similar. Click on it and follow the prompts to authorize the scheduling tool to access your Instagram account.
Authenticating Your Account
Once you initiate the connection process, Instagram will prompt you to authenticate and authorize the scheduling tool to manage your account. Follow the on-screen instructions to grant the necessary permissions.
Step 3: Uploading Your Content
Once you have planned and created your captivating Instagram post, the next step is uploading it onto the platform. Follow the steps below to ensure your content is shared effectively and efficiently:
Accessing the Instagram App
To begin, open the Instagram app on your mobile device or access the Instagram website on your computer. Make sure you are logged into the correct account where you want to post your content.
Uploading Your Post
Click on the plus icon at the bottom of the screen to start the upload process. Select the image or video you wish to post from your device’s gallery. Add a catchy caption that includes relevant hashtags and mentions.
Emphasize important keywords in your caption to improve the discoverability of your post. Engage with your audience by asking questions or encouraging them to interact with your content.
Choosing the Right Time to Post
Consider the best time to share your content based on your audience’s activity on Instagram. Use insights from Instagram analytics to identify peak engagement times and schedule your posts accordingly.
Posting at optimal times can increase the visibility and reach of your content, ultimately improving engagement and growth on the platform. Stay consistent with your posting schedule to maintain audience interest.
Step 4: Setting the Date and Time for Your Post
Once you have crafted your captivating Instagram post, it’s crucial to select the optimal date and time to ensure maximum visibility and engagement.
Best Time to Post on Instagram
Research shows that the best times to post on Instagram are typically during lunchtime (11 a.m. to 1 p.m.) and in the evenings (7 p.m. to 9 p.m.) when users are most active.
Posting at these times can help you reach a larger audience and increase the likelihood of your content being seen.
Utilizing Instagram Insights
Instagram Insights provides valuable data on when your followers are most active on the platform. By analyzing this data, you can determine the optimal posting schedule tailored to your specific audience.
Consider experimenting with different posting times and days to identify the posting schedule that yields the highest engagement rates.
Step 5: Adding Captions and Hashtags
Once you have selected the perfect image and scheduled the post, it’s time to craft engaging captions and relevant hashtags to maximize your Instagram post’s reach and engagement.
Writing Engaging Captions
When writing captions, consider your brand voice and the message you want to convey in connection to the image. Use emojis to add personality and break up long text for better readability. Remember to be authentic and relatable to your audience.
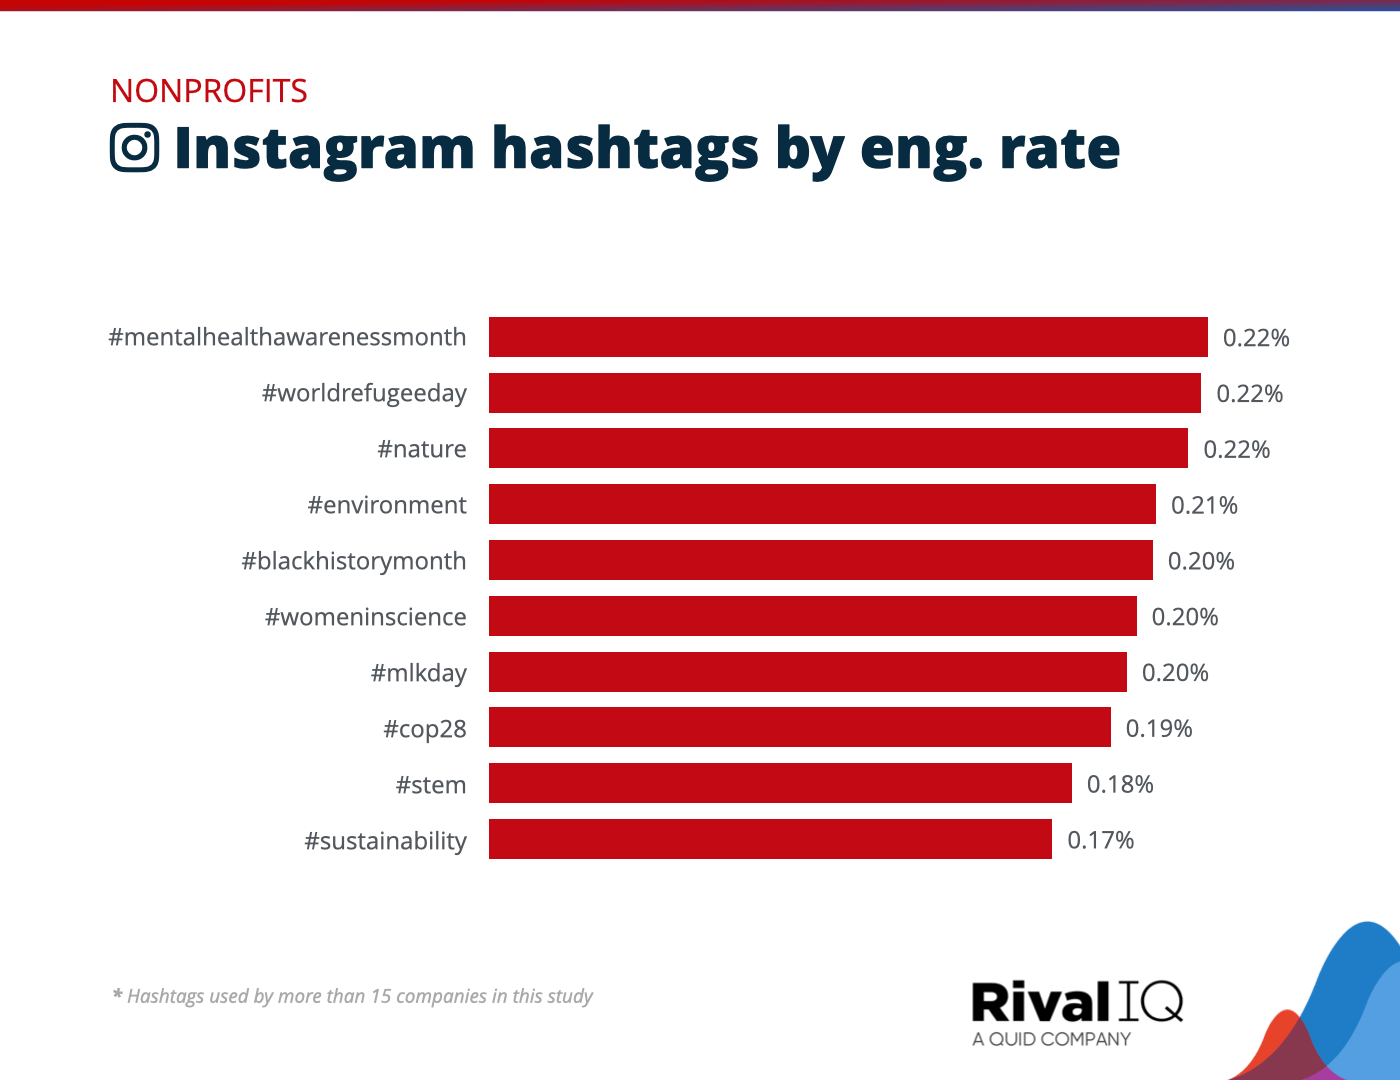
Strategic Hashtag Usage
Hashtags are essential for increasing visibility. Research popular and niche hashtags related to your post to attract a larger audience. Including a mix of trending and specific hashtags can help you reach a wider range of users. Don’t overdo it!
- Use around 5-10 relevant hashtags per post
- Explore niche hashtags to target specific audiences
- Keep an eye on trending hashtags to stay current
Step 6: Previewing and Finalizing Your Scheduled Post
After setting the date and time for your Instagram post, it’s essential to preview and finalize your content before it goes live. This step ensures that your post appears exactly as you want it to and helps you catch any errors or issues.
Preview Your Post
Click on the preview button to see how your scheduled post will look on Instagram. This allows you to check the layout, captions, and any included media to ensure everything appears as intended.
You can also use third-party scheduling tools for a more comprehensive preview of your post across different devices.
Finalize Your Post
Before finalizing your scheduled post, double-check the caption, hashtags, and tagged accounts to guarantee accuracy.
- Ensure all links are working and direct to the correct landing pages.
- Verify that your post complies with Instagram’s community guidelines.
- Make any last-minute tweaks or adjustments to optimize engagement.
Optimizing Your Posting Schedule for Engagement
When it comes to scheduling Instagram posts, timing is crucial for maximizing engagement. Based on real-time data, optimizing your posting schedule can significantly impact the visibility and reach of your content.
Best Times to Post on Instagram
Knowing the optimal times to post can help you reach a larger audience. Generally, early mornings and evenings witness higher engagement rates.
It’s essential to consider your target audience’s time zones, as timing may vary based on their geographic location.
Utilizing Instagram Insights
Instagram Insights provides valuable data on your followers’ behavior patterns, including when they are most active on the platform. Leveraging this information can guide your posting schedule for better engagement.
- Identify peak engagement hours through Insights.
- Experiment with posting at different times to gauge response.
- Adjust your schedule based on audience interaction.
Tips and Tricks for Successful Instagram Post Scheduling
When it comes to scheduling Instagram posts like a pro, there are several tips and tricks that can help you streamline your process and maximize your reach. Here are some key strategies to enhance your Instagram post scheduling game:
1. Utilize Instagram Insights
Take advantage of Instagram Insights to identify the optimal times to post based on your audience’s activity. Use this data to schedule your posts during peak engagement hours.
Additionally, analyze the performance of your past posts to understand what content resonates best with your followers.
2. Experiment with Different Posting Times
Try posting at various times of the day to determine when your audience is most active. Test different time slots and observe which ones generate the highest levels of engagement.
Remember that the ideal posting times may vary depending on your target audience and their browsing habits.
3. Use Scheduling Tools
Consider utilizing third-party scheduling tools like Buffer, Hootsuite, or Later to plan and automate your Instagram posts. These tools allow you to schedule content in advance, ensuring a consistent posting schedule.
Automation can help you save time and maintain a consistent brand presence on Instagram.
4. Optimize Your Captions and Hashtags
Craft compelling captions that resonate with your audience and encourage engagement. Use relevant hashtags to increase the visibility of your posts and attract new followers.
Research popular hashtags in your niche and incorporate them strategically into your captions.
5. Engage with Your Followers
Don’t just schedule posts and walk away – actively engage with your audience by responding to comments and messages. Building meaningful connections with your followers can boost your Instagram performance.
Allocate time each day to interact with your audience and foster a sense of community around your brand.
Frequently Asked Questions
- Why should I schedule Instagram posts?
- Scheduling Instagram posts allows you to maintain a consistent posting schedule, reach your audience at optimal times, and free up time for other tasks.
- What tools can I use to schedule Instagram posts?
- There are several tools available such as Buffer, Hootsuite, Later, and Planoly that allow you to schedule Instagram posts in advance.
- Is it important to consider the best time to schedule Instagram posts?
- Yes, knowing when your audience is most active on Instagram can help you maximize engagement and reach.
- Can I schedule Instagram posts through the Instagram app?
- As of now, Instagram does not allow direct post scheduling within the app, but you can use third-party tools mentioned earlier to schedule posts.
- Are there any tips for creating engaging scheduled Instagram posts?
- To create engaging posts, focus on high-quality visuals, use captions that spark conversation, and interact with your audience through comments and messages.
Final Thoughts
Mastering the art of scheduling Instagram posts is a game-changer for individuals and businesses alike. By following the step-by-step guide outlined in this blog, you can streamline your content creation process, maintain a consistent posting schedule, and engage with your audience effectively. Remember to leverage the power of scheduling tools like Later or Hootsuite to optimize your posting strategy. Keep in mind the importance of understanding your audience, analyzing insights, and staying authentic to your brand voice. With dedication and creativity, you can truly schedule Instagram posts like a pro and elevate your social media presence.