Are you tired of sending emails at odd hours and wish you could schedule them to be sent at a more appropriate time? If you’re using Outlook, you’re in luck! Learning how to schedule an email in Outlook can streamline your communication and help you appear more professional and organized. In this comprehensive guide, we will walk you through the step-by-step process of scheduling emails like a pro. From composing your message to selecting the perfect delivery time, we’ve got you covered. By mastering this feature, you can ensure your emails reach the recipient’s inbox at the optimal moment, making a lasting impact. Let’s dive in and elevate your email management game!

Introduction to Scheduling Emails in Outlook
As of the current year, learning how to schedule an email in Outlook efficiently is a valuable skill that can enhance your productivity. By using the email scheduling feature, you can compose emails at your convenience and set them to be sent at a later time, ensuring that important messages reach recipients at the optimal moment.
Setting Up Email Scheduling in Outlook
To begin scheduling emails in Outlook, open the application and navigate to the “New Email” option.
Compose your email as you normally would, filling in the recipient’s email address, subject line, and message content.
Next, locate the “Options” tab at the top of the email composition window and select “Delay Delivery”.
Choose the desired date and time for the email to be sent and click “Send”.
Benefits of Scheduling Emails
By scheduling emails in Outlook, you can avoid the hassle of remembering to send important messages at the right moment.
It allows you to work efficiently by preparing emails in advance and ensuring they are delivered at the most appropriate time for the recipient.
Additionally, scheduling emails can help you manage your communication effectively and maintain better control over your workflow.

Benefits of Scheduling Emails
Scheduling emails in Outlook offers several advantages, making it a valuable feature for professionals and individuals alike.
Increased Productivity
By scheduling emails, you can plan and organize your communication in advance, allowing you to focus on other tasks without interruption. This enables you to maintain productivity and ensure timely responses to important messages.
Time Management
Scheduling emails helps in time management by allowing you to set aside specific times for composing and sending messages. You can prioritize your inbox and allocate time for other crucial activities, reducing email-related stress and distractions.
Global Reach
With the ability to schedule emails, you can reach recipients in different time zones at optimal times. This feature ensures that your emails are delivered when they are most likely to be noticed and responded to, increasing the effectiveness of your communication.
Professionalism
Scheduling emails allows you to maintain a professional image by sending messages during business hours or at appropriate times. This feature is particularly useful for remote workers or individuals managing international clients, as it reflects a sense of professionalism and efficiency.
Step 1: Open Outlook and Compose a New Email
When looking to schedule an email in Outlook, the first step is to open the Outlook application on your computer or device. Once Outlook is launched, navigate to the “Home” tab located at the top menu bar.
Accessing the “New Email” Option
To compose a new email, click on the “New Email” button. This will open a blank email template where you can start drafting your email content. Make sure to include the recipient’s email address, subject line, and the main body of the email.
Attaching Files and Formatting
For scheduling an email with attachments or specific formatting, use the toolbar options within the email composition window. Insert images, documents, tables, or apply formatting styles to enhance the visual appeal of your email.

Step 2: Click on the Options tab
Once you have composed your email in Outlook, the next step in scheduling an email is to click on the Options tab located in the toolbar at the top of the screen. This tab contains various settings and features that allow you to customize the delivery of your email.
Accessing the Options Tab
To find the Options tab, look for the toolbar near the top of the Outlook window. It usually contains tabs like “File,” “Home,” “Send/Receive,” and more. Click on the “Options” tab to reveal additional settings related to your email.
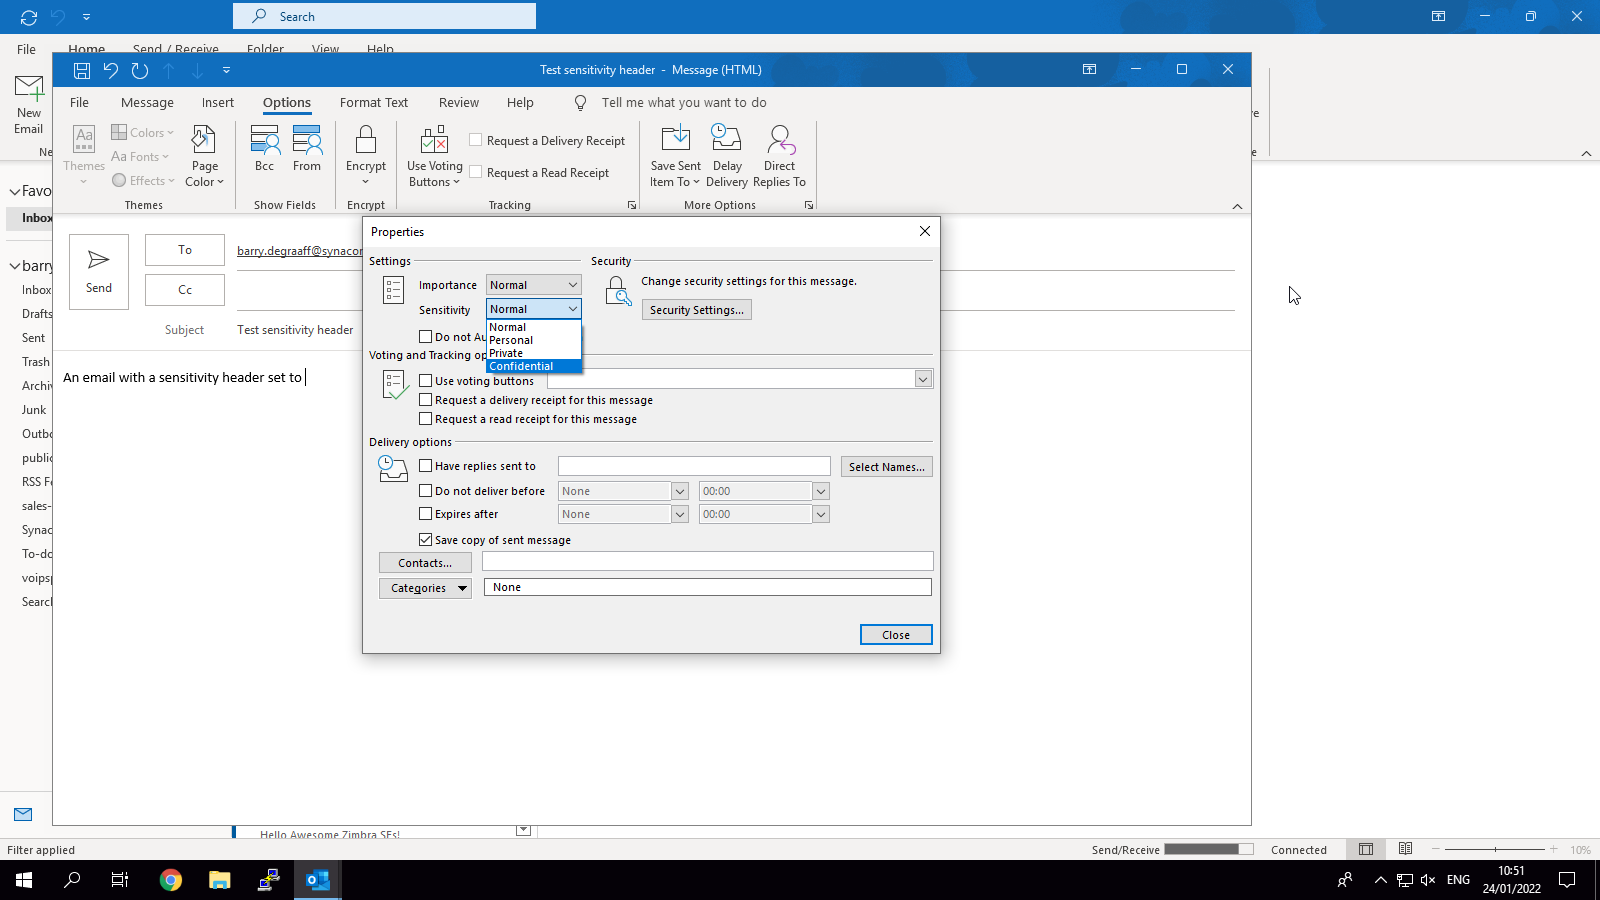
Within the Options tab, you will find different functionalities such as sensitivity, importance, and the delay delivery option.
Setting Email Sensitivity
By setting the sensitivity of your email, you can designate who can access the email content and how they can interact with it. This feature is particularly useful for confidential or sensitive information. You can choose between Normal, Personal, Private, or Confidential options based on your needs.
Importance Level
Adjusting the importance level of your email can help the recipient prioritize their responses. You can mark an email as High Importance, Normal Importance, or Low Importance based on the urgency or significance of the message.
Delay Delivery Option
Using the delay delivery option, you can schedule when your email will be sent. This feature allows you to set a specific date and time for delivery, ensuring that your message reaches the recipient at the most opportune moment. This could be useful when dealing with recipients in different time zones or when you want to maintain communication consistency.
Step 3: Choose “Delay Delivery”
When you want to ensure your email lands in the recipient’s inbox at just the right moment, the “Delay Delivery” feature in Outlook comes in handy. This feature allows you to schedule your email to be sent at a later time and date, giving you the flexibility to compose your message in advance and have it delivered at the most appropriate time.
Setting Up Delay Delivery
To schedule an email using the “Delay Delivery” feature in Outlook, follow these simple steps:
- Compose your email: Start by composing your email as you normally would.
- Go to the Options tab: Once your email is ready, head over to the Options tab at the top of the email composition window.
- Click on “Delay Delivery”: In the More Options group, look for “Delay Delivery” and click on it.
- Choose the delivery date and time: A dialog box will appear where you can specify the date and time you want your email to be sent.
- Click “Close”: After setting the delivery time, click “Close” to apply the delay delivery settings to your email.
- Send your email: Once you are satisfied with the scheduled delivery time, simply click on “Send” as usual.
Step 4: Set the Date and Time for Sending
Once you have composed your email and added the recipients, it’s time to schedule the date and time for sending. In Outlook, this feature allows you to send your emails at the most optimal times, even if you are not online to hit ‘send’.
Choosing the Date
When setting the date for sending your email, consider factors like the recipient’s time zone, their work hours, and when they are most likely to check their inbox. It’s essential to send your email when it’s most likely to be seen.
You can schedule emails for the same day, a specific date in the future, or even for recurring schedules using Outlook’s intuitive scheduling options.
Selecting the Time
After choosing the date, pick the exact time for sending your email. Timing can significantly impact the open and response rates of your email. Aim for sending emails during working hours when recipients are actively checking their inboxes.
Ensure you consider any time differences between you and the recipients to ensure the email lands in their inbox at a convenient and appropriate time.
Step 5: Review and Confirm Scheduled Email
After setting up the details and scheduling the email, it is crucial to review and confirm the scheduled email to ensure accuracy and timeliness.
Verify Recipients and Subject Line
Double-check the recipients’ list to ensure all intended recipients are included. Verify the subject line to ensure it is clear and concise, reflecting the email’s content.
Review Email Content and Attachments
Thoroughly review the email content for any errors, typos, or formatting issues. Ensure that all necessary attachments are properly included and accessible to recipients.
Confirm Delivery Date and Time
Confirm the scheduled delivery date and time to ensure it aligns with the intended timing for the email to reach recipients. Make any necessary adjustments if needed.
Tips for Efficient Email Scheduling
Efficient email scheduling in Outlook can save you time and ensure your emails are sent at the right moment. Below are some tips to help you master this process.
Set Clear Objectives
Before scheduling an email, clearly define the objective of your message. Knowing your purpose will help you craft a more effective email.
Include a specific call-to-action to guide recipients on the desired next steps.
Choose the Right Time
Timing is crucial when scheduling emails. Consider the time zone of your recipients to ensure they receive the email during their active hours.
- Use data-driven insights to determine the best time to send emails for maximum engagement.
- Experiment with different sending times to find what works best for your audience.
Frequently Asked Questions
- How do I schedule an email in Outlook?
- To schedule an email in Outlook, you can use the ‘Delay Delivery’ feature which allows you to set a specific date and time for the email to be sent.
- Can I schedule recurring emails in Outlook?
- Yes, Outlook allows you to schedule recurring emails by setting up a recurring appointment or meeting in the calendar and adding recipients to it.
- Are there any limitations to scheduling emails in Outlook?
- While scheduling emails in Outlook is a useful feature, there are limitations such as the need to keep your computer turned on and Outlook running at the scheduled time for the email to be sent.
- Can I edit or cancel a scheduled email in Outlook?
- Yes, you can edit or cancel a scheduled email in Outlook by going to the ‘Outbox’ folder, locating the scheduled email, and making the necessary changes or deleting it.
- Is scheduling emails in Outlook secure?
- Scheduling emails in Outlook is secure as long as you follow good email security practices such as not including sensitive information in the email and keeping your Outlook account secure.
Final Thoughts
In conclusion, mastering the art of scheduling emails in Outlook can boost your productivity and efficiency in managing your communication. By following the step-by-step guide outlined in this blog, you can easily schedule emails like a pro, saving time and ensuring timely delivery of important messages. Remember to utilize the delay delivery feature, set the desired date and time, and review your scheduled emails to avoid any mistakes. Additionally, experimenting with recurring schedules can further streamline your email management process. So, take control of your inbox and start scheduling emails in Outlook with confidence and ease!